

This tutorial requires a good working knowledge of Paintshop Pro and was created using Paintshop Pro Photo XI, but should work with earlier versions as well.
Filters needed:
Alien Skin Xenofex 2 Classic Mosaic and Constellation
Simple Filters, Quick Tile
Okay, let's go!
1. Open a new image, 300 x 300 pixels in size with a transparent background and floodfill with your choice of colour.
2. Go to Adjust>Add/Remove Noise>Add Noise at 10% with both Uniform and Monochrome selected.
3. Got to Effects>Plug Ins>Alien Skin Xenofex 2 Classic Mosaic using the following settings:
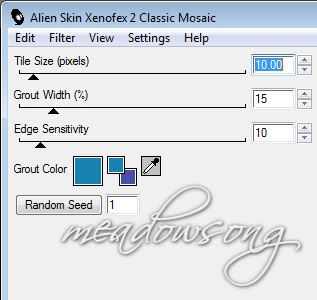
make sure to use a colour slightly darker than the colour that you initially started this tutorial with.
4. Go to Effects>Plug Ins>Alien Skin Xenofex 2 Constellation using the following settings:

5. Go to Effects>Plug Ins>Simple>Quick Tile and apply.
6. Save your finished tile as a jpg and you are done! This tile will be suitable for seamless background.


2 comments:
Woohoo, thanks hun
fast and easy to follow!!
Great to hear, I'm glad you liked it :)
Post a Comment